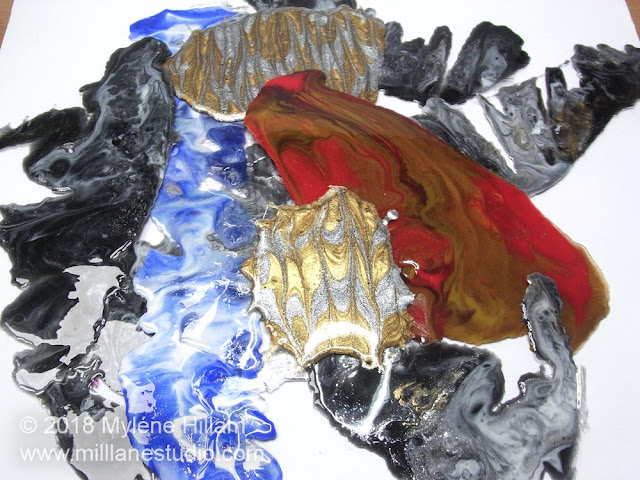
Are you like me and unable to throw out the resin overflow from your resin art canvases? All that gorgeous marbled resin overflow creates such pretty patterns as it drips over the edge of your resin paintings onto your work space. I just hate to waste resin so I collect it and save it for other projects.
One of the ways you can use it is to die cut it into circles that you can turn into orb beads.
If you want to collect your resin overflow too, then make sure you're working over a surface that the resin won't stick to. I use a painter's plastic drop sheet to catch the drips. If it's polypropylene or polyethylene, you'll be able to peel the resin right off once it's cured.
So here's the process I use to put that pretty marbled resin to use.
First, you'll need:
Poly Paper painter's drop sheet
Resin overflow. I use EnviroTex Lite epoxy resin for my paintings
Sizzix Big Shot die cutting machine
Sizzix Bigz Die, 1" circle
Heavy duty scissors - I recommend Tonic Studios scissors for easy cutting
Emery board
Important Note:
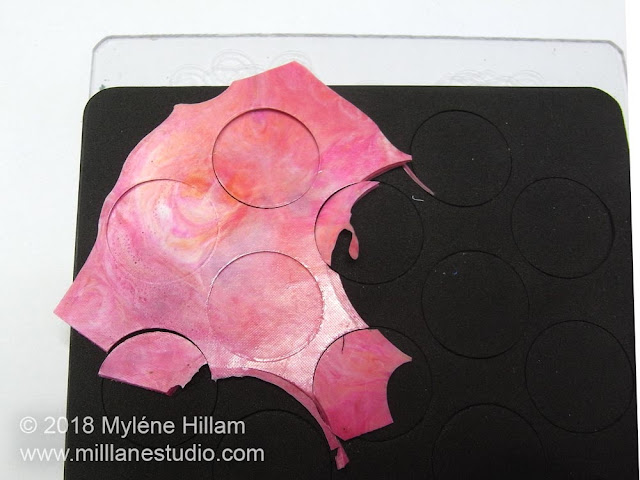
Once your resin overflow has cured, cut it into smaller sheets that will fit through the bed of the Sizzix Big Shot. The most important thing is to make sure that the pieces you choose are not too thick for the Big Shot to handle. The Big Shot will handle pieces as thick as chipboard so look for pieces no thicker than that. If you have to force your resin pieces through, then they are too thick and will most likely destroy your Big Shot. If your resin overflow is thicker than that, see the video at the bottom of the post for another way to cut it.Cutting Resin Sheets with the Big Shot
Place a piece of resin onto the die. You have two choices: place the best marbled pattern onto a circle and have a lot of wastage, or be as economical as you can and position the resin on the die to get the largest number of circles.Sandwich the die and resin between the two acrylic plates and place them on the bed of the Big Shot. I place the die facing up so I can see what's happening. It's also a good idea to centre the die in the middle of the plates so that they can easily feed into the machine. Wind the sandwich through slowly. If there is too much resistance, STOP! If there is only a little resistance, continue. You'll hear the plates cracking as they flex through the rollers which will make your heart skip for a moment. As long as they don't actually crack, it's OK.
And this is what you'll end up with: some perfectly cut marbled resin circles.
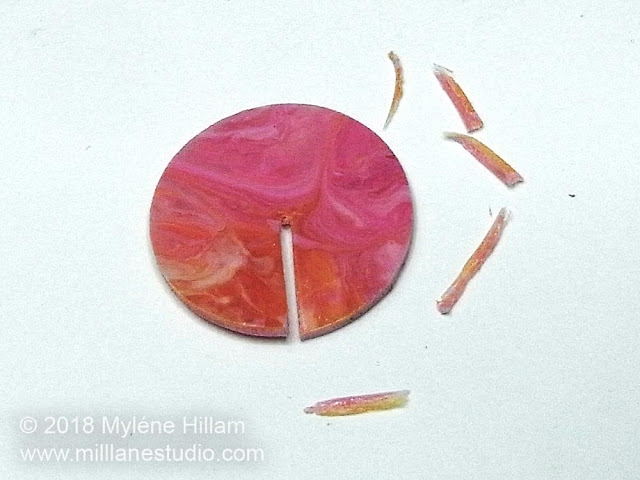
Cut a slit from the edge of a circle into the centre. Take your time doing this and "nibble" at it because sometimes, cured resin can be brittle and if you cut it all in one action, it can break.
Trim the slit until it is wide enough to slot another circle sideways into it. It should be a fairly tight fit.
File away the rough edges with the emery board. I found that an emery board is the perfect thickness to sand both sides at once.
The edges of the slot should be really smooth. Take care not to overdo the sanding or you'll make the slot too wide.
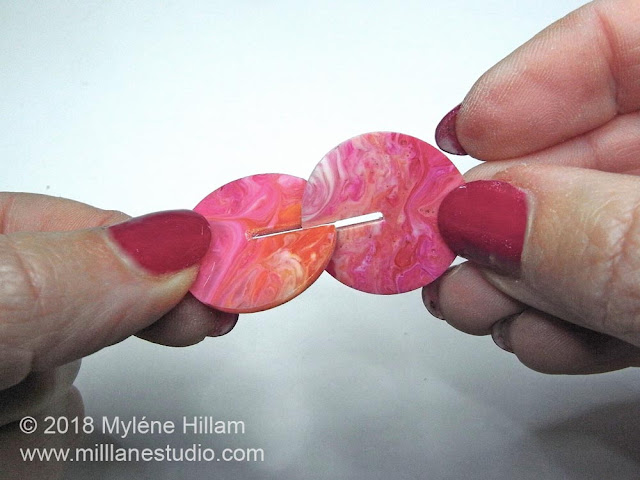
Cut a slot into a second circle and then slot the two pieces together.
They should be snug enough that you have to use a little pressure as you slide the two pieces together and each side of the circle should sit at a right angle to the one on either side of it. If they're too tight, they won't sit properly so file away just a little bit more. If you've made your slots too wide, you'll need to add a dab of adhesive to help the circles sit correctly.
Make a additional orb beads to turn into jewellery. For earrings, you'll need two sets of circles.
Some of these beads look like planets in the solar system.
What to do if your Resin Overflow Sheets are Too Thick
If your resin sheets are too thick to run through a die cutting machine, then watch this short video to learn how you can easily cut through thicker sheets.
Now, let's turn these orb beads into earrings!
You'll need:
4 x 1" marbled blue resin overflow disks with slots
12 x 5mm silver jump rings
2 x Silver ball end earring wires
2 x Silver filigree moon charms (this one is similar)
2 x Silver star beads
2 x Silver ball ended head pins
Drill with 1mm drill bit - I highly recommend the Her Embosser Tool for jewellery making because it's lightweight and portable.
Pliers: chain nose pliers; round nose pliers; flat nose pliers; side cutters
Connect the top jump rings together with another jump ring and while it is still open, hook on a 2.5cm (1") length of chain.
Slip the earring wire through the top link of the chain. Make a second earring to match.
Open the loop of the earring wire and hook it through the filigree bead cap.
Mix the 5-minute epoxy and apply a small amount to the centre of the filigree. Place a flatback crystal on the adhesive.
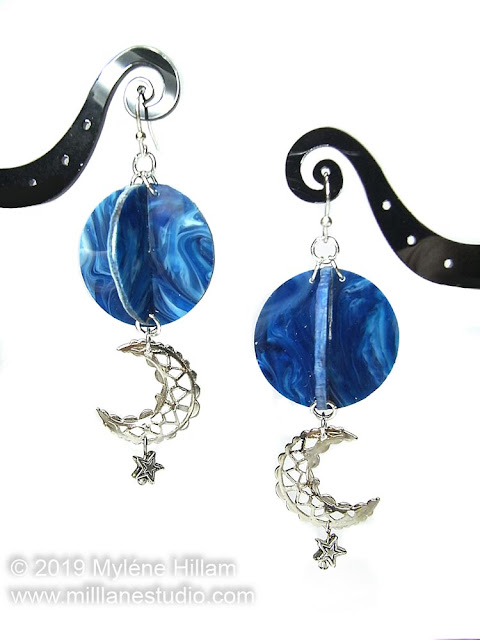
EARTH, MOON and STAR EARRINGS
You'll need:
4 x 1" marbled blue resin overflow disks with slots
12 x 5mm silver jump rings
2 x Silver ball end earring wires
2 x Silver filigree moon charms (this one is similar)
2 x Silver star beads
2 x Silver ball ended head pins
Drill with 1mm drill bit - I highly recommend the Her Embosser Tool for jewellery making because it's lightweight and portable.
Pliers: chain nose pliers; round nose pliers; flat nose pliers; side cutters
- Drill a hole on either side of the slit, 1mm in from each edge of both disks.
- Insert a jump ring in through each hole and close it.
- Slot the two disks into each other.
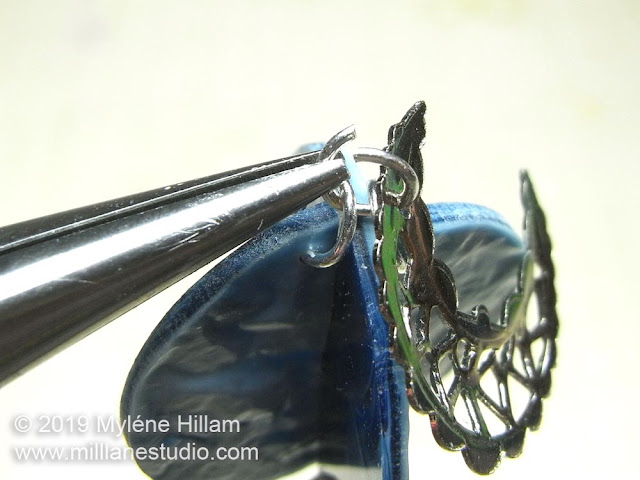
- Hook another jump ring through the two closed jump rings.
- Whilst it's still open, hook the moon charm onto the jump ring.
- String the star bead onto the head pin and turn a simple loop. Hook the loop through the bottom of the moon.
- Connect the two top jump rings together with another jump ring and then hook it onto the earring wire. Make a second earring to match.
PINK and BURGUNDY ORB EARRINGS
4 x 1" marbled pink resin overflow disks with slots
5cm (2") fine gold cable chain
12 x 5mm gold jump rings
Pliers: chain nose pliers; round nose pliers; flat nose pliers; side cutters
Follow steps 1-4 of the Earth, Moon and Star earrings above.
String a tear drop bead on a head pin and bend it at a 90° angle. Trim the head pin approximately 10mm (3/8") from the bead and then turn a simple loop. Connect the tear drop to the orbit bead with jump rings.
Connect the top jump rings together with another jump ring and while it is still open, hook on a 2.5cm (1") length of chain.
Slip the earring wire through the top link of the chain. Make a second earring to match.
To make the tassel orb earrings, you'll need:
4 x 1" charcoal resin overflow disks with slots
2 x 10mm gunmetal filigree circle bead caps
1 x pink thread tassel
1 x silver chain tassel
12 x 5mm gunmetal jump rings
Pliers: chain nose pliers; round nose pliers; flat nose pliers; side cutters; Crystal Katana
Follow steps 1-5 of the Earth, Moon and Star earrings, substituting the filigree bead cap for the crescent moon charm. Hook the thread tassel on the bottom of one orb and the chain tassel on the other.
Open the loop of the earring wire and hook it through the filigree bead cap.
Mix the 5-minute epoxy and apply a small amount to the centre of the filigree. Place a flatback crystal on the adhesive.
Subscribe to:
Post Comments (Atom)


