Monday, May 23, 2011

Expanding the Brief

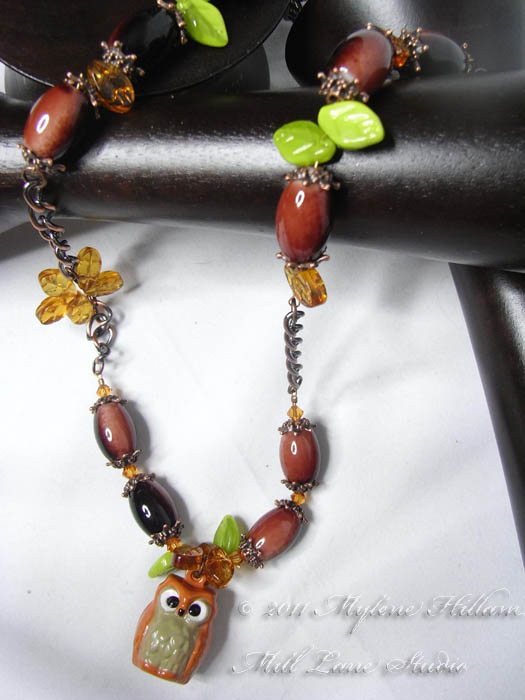
I've been working on some magazine projects this past couple of weeks. My brief was very broad: anything that is inspired by autumn. No restrictions as to what stringing material to use, or type of beads or even whether I chose to make a necklace, bracelet or earrings. It was all up to me. So without guidelines to work to, how do you go about fulfilling a brief like this? You only know where you have to end up but you don't have a starting point as you haven't been told what materials to use or what style is required. Your brief is very........ well, brief! Well, this is how I go about it. I like to go through a warm-up period whilst I get a handle on the theme. This usually means starting with something simple like a pair of earrings and then perhaps I'll progress to a strung piece or two, maybe a necklace, maybe a bracelet. By about this time, I'm starting to get a feel for the theme and some ideas begin to formulate in my head. Along the way I will have tried...
Wednesday, May 11, 2011

Whilst I'm in the Mood

Do crafters ever stop looking for the perfect storage solution? It seems to be an ongoing process, one that we are constantly fine tuning. I'm finding that what worked for me when I first set up my studio 18 months ago, is in need of a little updating right now. And that's what today's post is about.... I'm in the mood for a little bit of organising! One of the things that irks me most about my studio is my paper/cardstock storage system - in particular, my offcuts. They are encroaching on my floor space and the pile is threatening to topple over - it's not an attractive sight! Here's what I'm talking about - I have 2 of these tubs overflowing with cardstock scraps, as well as various other cartons and containers stacked in the corner taking up way too much space. It's time for an overhaul of this system! This is how I've been storing my offcuts - in ziplock bags, sorted by colour. Not a bad solution but it's become untidy as the collection...
Monday, May 9, 2011

A Gift of Organisation

I am such a lucky Mum.... look what my husband and children gave me for Mother's Day! Of course, it didn't come assembled like this..... but it did come with instructions! I love putting together flat pack furniture, especially when it goes together this easily. So this is how I spent my Mother's Day...... Step 1. Unpack all the bits and check that they're all there. Step 2. Insert the screws into the pre drilled holes....... and then tighten with a screw driver. Step 3. Assemble the frame. By this stage, I was having so much fun that I forgot to photograph this step, but it's very easy as there are only five pieces; top, bottom, 2 sides and the back. Tighten the locking nuts that slot into the screws previously inserted. If you've ever assembled Ikea furniture then you'll know the process. Although this piece is from the Mini Stackables range by Best Craft Organizer, it's a very similar construction. Step 4. Screw in the castors and the unit i...