Friday, August 27, 2010

cork noticeboard transformation

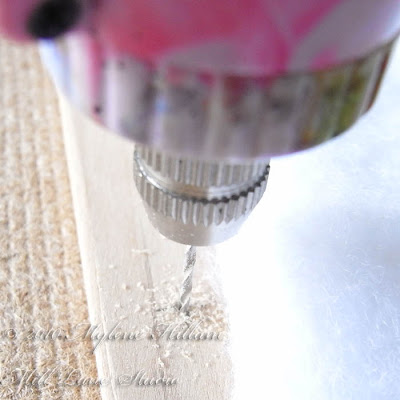
I had a guest join me in my studio yesterday - my lovely daughter! She was in a crafty sort of mood (a good mood to bring with you into my studio). She also brought with her a cork board for her room that needed some dressing up and some fabric and ribbon that she liked. Covering a cork board is a simple project but to secure the fabric to the cork board it was going to take a staple gun and we were both a bit apprehensive about using one as neither of us had used one before. We broke out into a chorus of nervous laughter at the thought of Macauley Culkin and Home Alone! Nervousness aside, we cleared away a table and spread everything out. The first task was to drill holes for the eye screws so that she could hang it when complete. This part was super easy - I certainly don't feel nervous using my trusty little battery-operated drill. I really loooove this tool and next to my jewellery pliers and Cuttlebug this would be the most used tool in my studio! I measured and marked out...
Friday, August 20, 2010

Kutalicious! Birdcage Terrarium Class

A while back I shared a preview of the Kutalicious projects I had been working on. Don't you love how the mirrored bird reflects extra detail from the other elements around it? Without a doubt, for that reason, the mirrored shapes are my absolute favourites but they are closely followed by the glossy black acrylic shapes. I am thoroughly enjoying working with this range of products and I'm really happy to say that they are Australian made. Cheree and Denise are working very hard to bring this product to market and you will begin to see it appear in more and more shops in the coming months. And I've heard a whisper that they are about to release their Christmas range so keep an eye out for that! But now, to the reason for this post - an upcoming class called Birdcage Terrarium. This elegant black and silver project features Kutalicious acrylic shapes, printed and plain acetate, sparkly black glitter and elegant chipboard scrolls. If you'd like to create this wonde...
Tuesday, August 17, 2010

Katiedids Jewellery Components

Each CHA show sees new products being released to the craft market and one of my favourites this year has been Katie Hacker 's Katiedids components by Beadalon. Katie gave us a teaser of them at the Winter show but at the summer show, she presented a class using these wonderful bezels and I was fortunate enough to take that class. Here's what we made: Matchstick Earrings Violet Scalloped Pendant Emeralds and Champagne Notice the interchangeable bail? I love the idea of swapping the focal pendant when you feel like a change!! To get the channel-set look, use 4mm round beads. But if you choose to use bicones instead, then you'll get a different look. Whilst we filled the channels with Swarovski crystals there are so many other possibilities: resin, Friendly Plastic, polymer clay, coiled wire - I just can't wait to start playing with these ideas! I'll post pics as soon as I have something to share. I'll be back again soon! I...
Monday, August 16, 2010

Beaded Bliss in the US

For an Aussie jewellery maker, a bead shopping trip in the US is like a visit to a great big candy store where each hook or tray of beads elicits more oohs and aahs than the last! Ah, such bliss! "Can I please have one of these, and two of those?" I asked the assistant. "Oh, and one of those too". It reminded me of how I used to spend my pocket money at the local deli when I was a child: the shopkeeper would fill the small paper bag with the lollies I picked out - one of these, and two of those and some of these as well. Ah..... such sweet memories! I can tell you that there were times I was drooling over some of the spectacular beads I saw. Look at these from Beadnix who had a stand at the CHA Craft Supershow in Chicago. Image courtesy of The Bead Goes On They had bowl after bowl filled with the most wonderful array of beaded beads like the one above. They were a little pricey, but worth it as you only need a few to create a spectacular necklace or brace...
Monday, August 9, 2010

Soft Flex Wire - Exposed!

Here's another great Make and Take I did at CHA. At the Soft Flex booth, they were using coloured beading wire to create earrings. Don't they look great? I've only ever used Soft Flex as a stringing wire before but this make and take shows that Soft Flex beading wire can be so much more than just a stringing material and with colours such as Tanzanite, Lapis and Blue Topaz why would you want to cover the beading wire up with beads. This project uses 49 strand wire and as its name suggests it is both soft and flexible. It really is a lovely material to work with. The colours I used are from the Trio set called Tranquility. I won't go into all the details of how to make these earrings because you can get the instructions on the project sheet from the Soft Flex website. If you'd like to have some fun playing around with exposed wire (sounds a bit dangerous, doesn't it?) check out some of the other projects from their project library . That's all ...